The Journal
A space to learn about wedding invitation Design, etiquette and stationery history
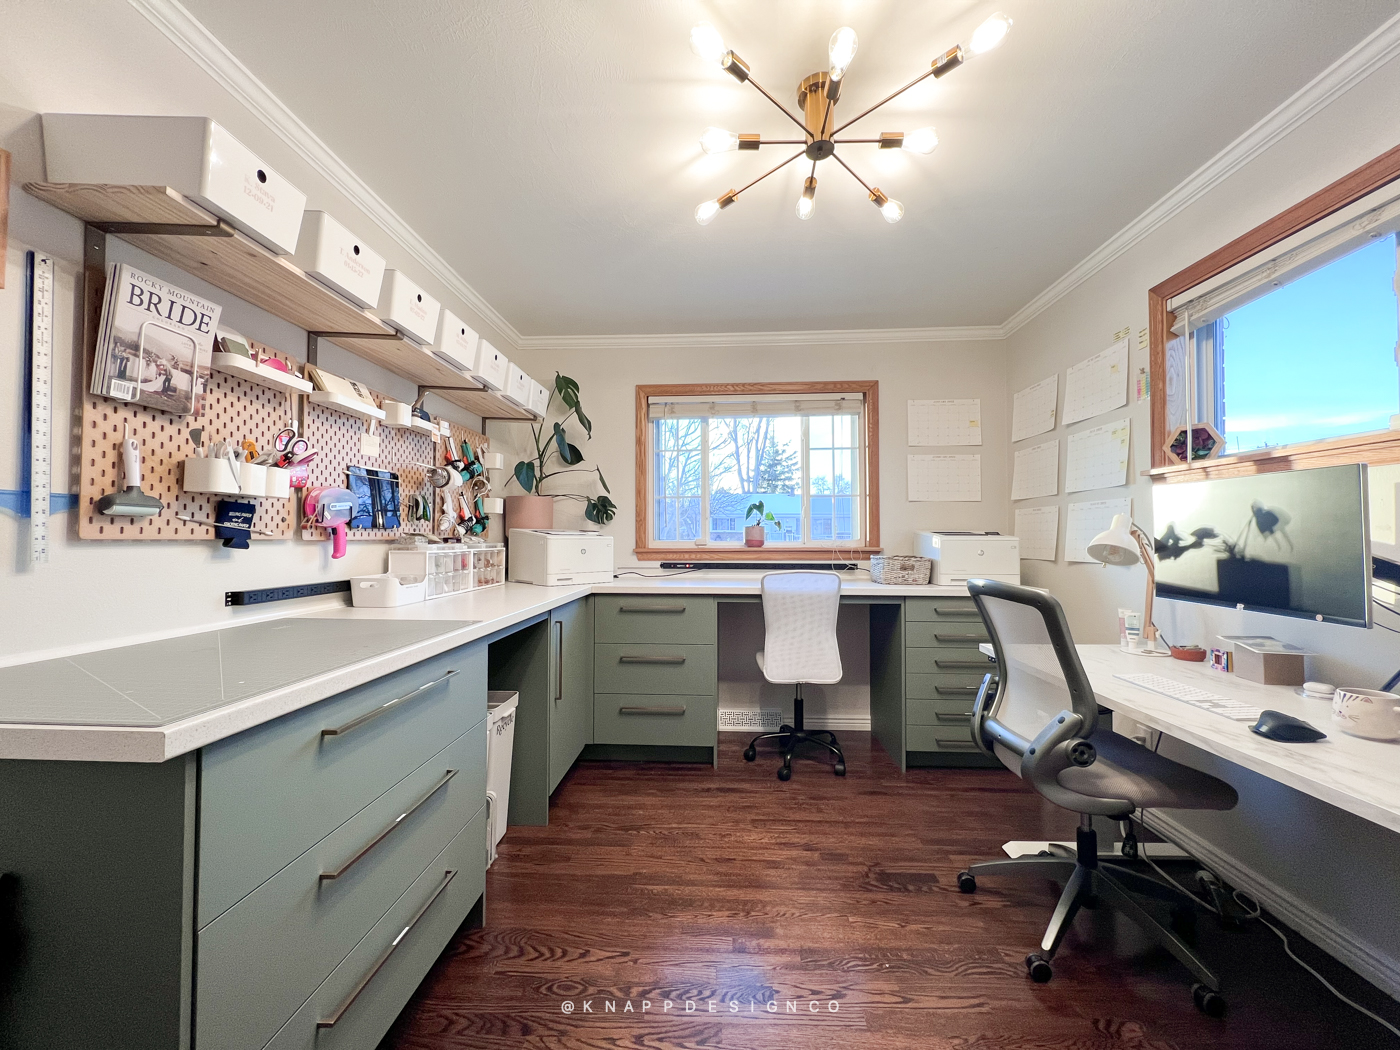
At the end of the year, we like to clean up and organize the studio and prepare it for the new year. We generally do this activity the week after Christmas, and it usually takes a day or two. But this year, we went all out with a full studio remodel!
In 2021, we had more clients than ever, and more popular than ever were embellishments like wax seals and ribbons and all those fun goodies. We love adding those design elements to invitation suites but assembling those things took up space, and we realized that we had almost NO countertop space. We found ourselves working on the kitchen island a lot, which was the only large surface that was semi-available to us. The kitchen is not where we wanted to work on luxury paper goods for the foreseeable future, so we decided to add 1000% more countertop space in the studio!
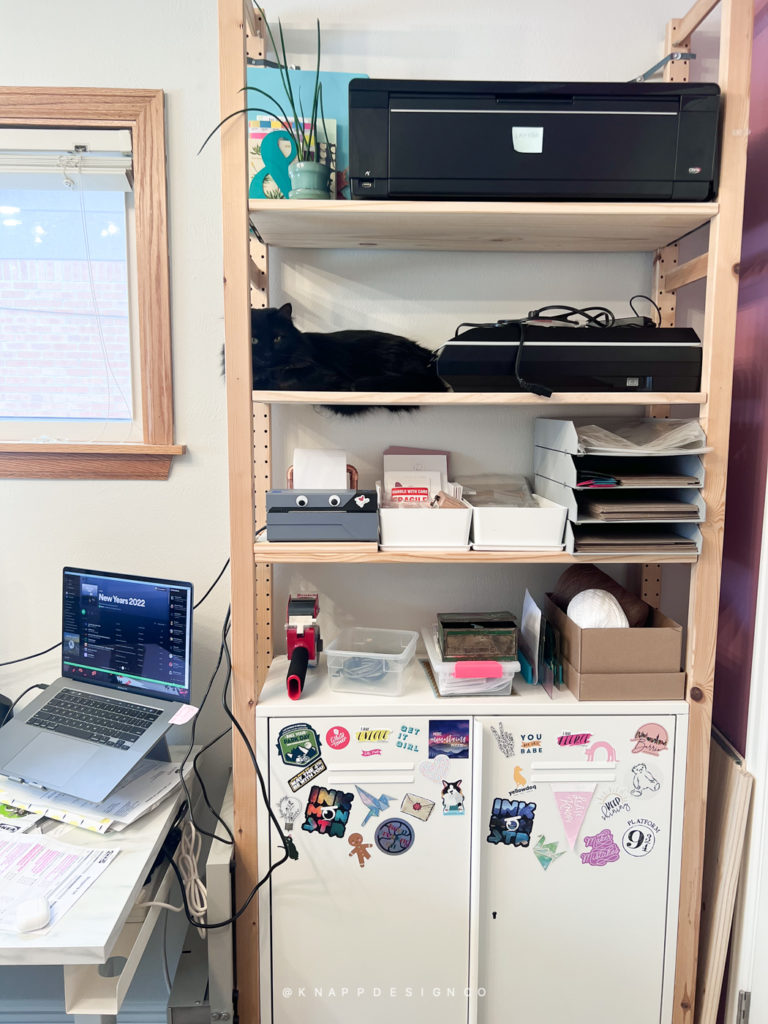
Here’s a little peek at what the studio was like most of the time. Constantly in a state of chaos since we were slowly running out of space!
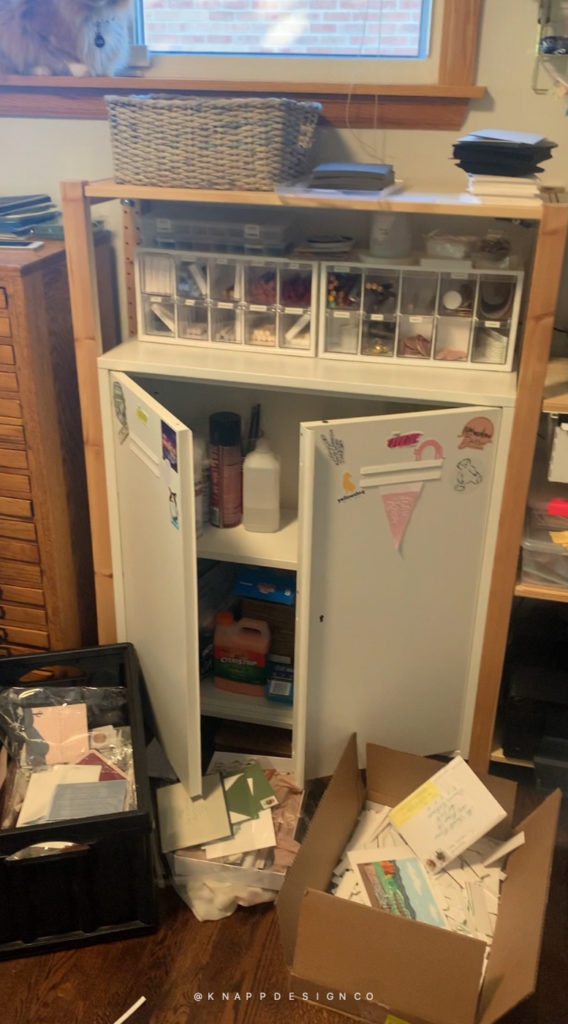
Boxes everywhere, is that trash, or is that client work? We’ll never know.
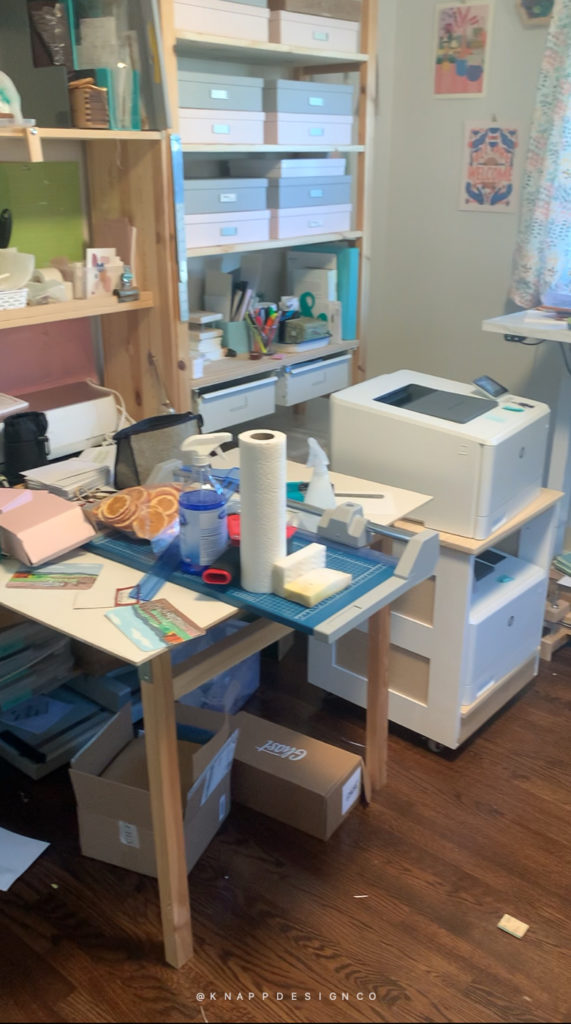
So many things stashed everywhere. Cleaning supplies mixed with packing supplies mixed with ongoing projects.
Priority number uno was making sure all our assembly items were in the same area and easily accessible by Kim and me at any point. We don’t like reaching too far for things (that hurts our backs), so we aimed for as little reach as possible. We felt confident, after a year of 80+ projects and hundreds of Santa Letters (seriously!) that we could optimize our space to be as efficient as possible.
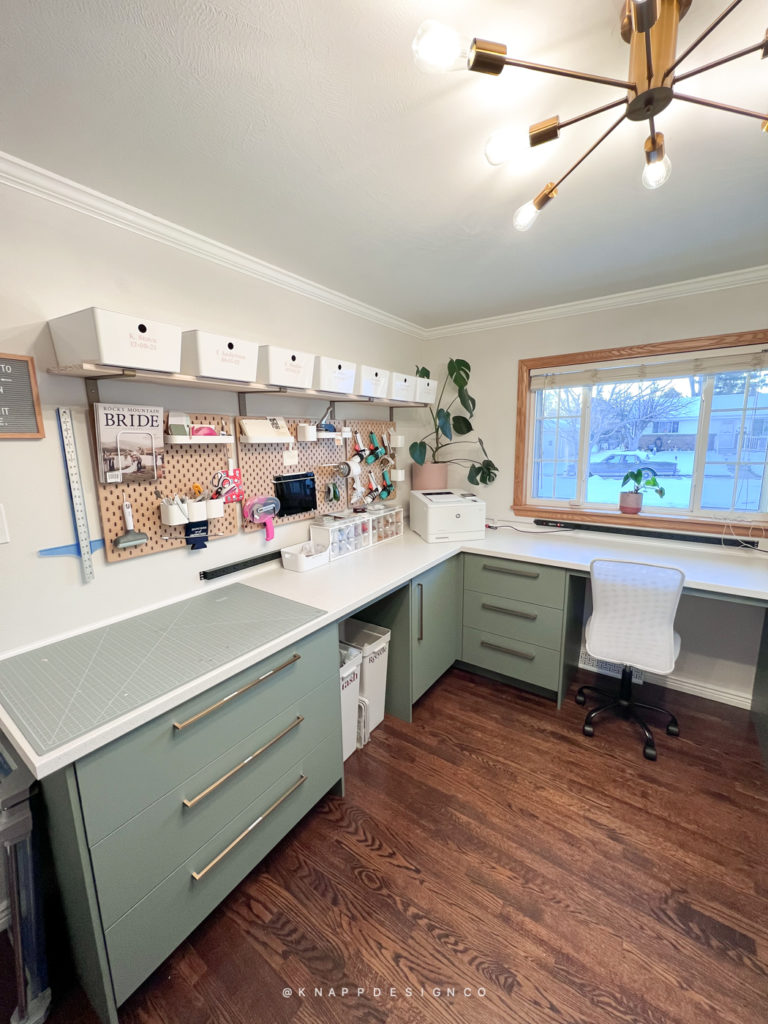
As you might have guessed, we are VISUAL people. It was pretty important, from a creativity and inspiration standpoint, that our studio be aesthetically pleasing. We don’t like a lot of clutter (which is hilarious because the old studio was a clutter zone!). We now have a clean, uber-organized workspace to assemble invitations, and it feels so good.
We started by laying out the studio on paper until it made sense. We wanted to have a space for Kim to sit and a spot for my desk (a standing desk with a monitor), and ample space for us to work side by side. The L shape of the counter was what we landed on. After that, we took it to the Ikea kitchen designer tool and laid it all out!
Why Ikea kitchen cabinets?
A few reasons that just made sense:
- They are an excellent height for working while standing. Think about it – all the work we do in the kitchen is standing, and that makes sense, so why not do the same thing for our studio space?
- The drawers come ALL THE WAY OUT. Like, all the way. No more trying to reach in the back to get something and jiggling everything around to squeeze it out. You can open the drawer and see all its contents.
- The drawers are true to size. Standard drawers are filled with deception. You think something is going to fit, but it doesn’t. We don’t like drawer deception.
- Soft-close everything. If you’re like me and hate the sound of slamming doors and drawers, these are the cabinets for you. No upcharge for soft-close – it’s just there, by default.
- The customization was easy (and cheap). We could get exactly what we wanted, where we wanted it, and no one had to call in a custom contractor.
- It was affordable! I share a price breakdown of everything at the bottom (with links), so you can see, but a remodel like this would have cost probably $7-10k easily if I outsourced it.
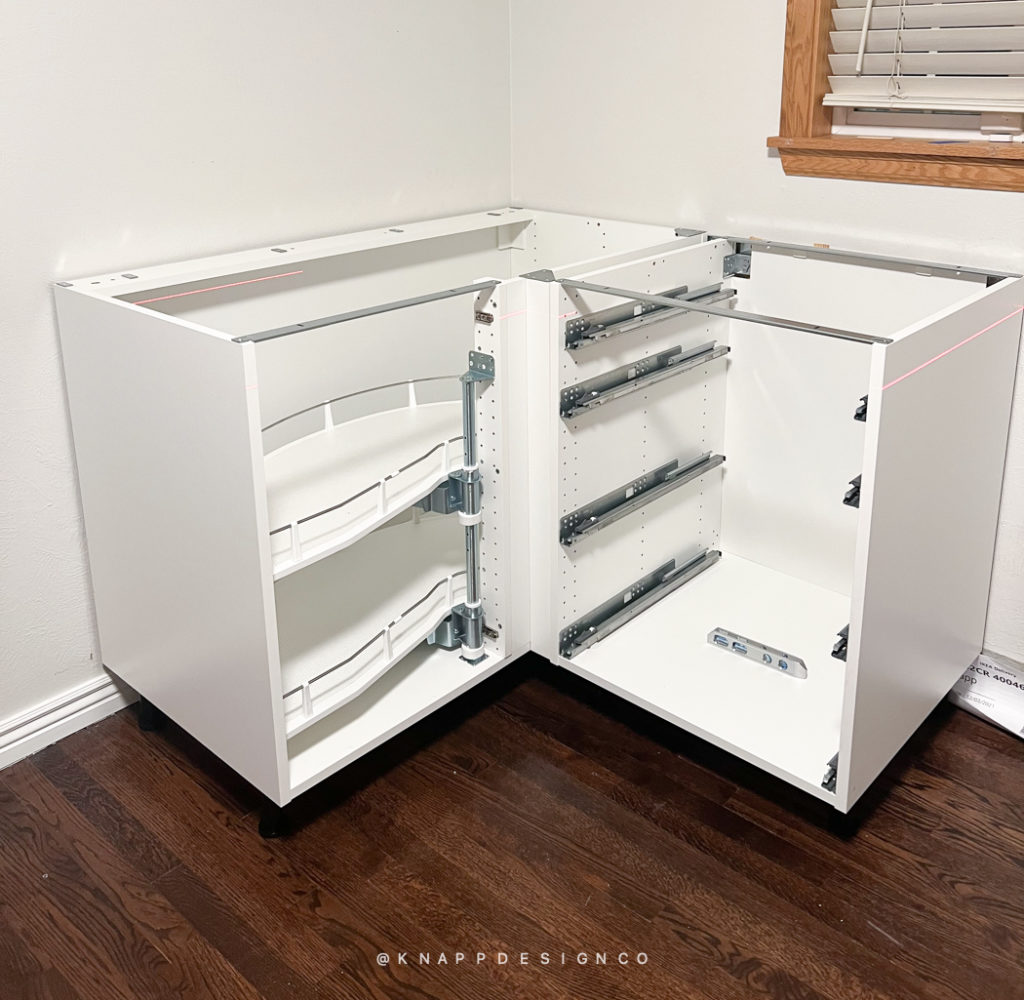
- The cabinets are pretty easy to put together and install, except for the damn corner unit.
- They look GOOOD. Like real good.
- When we move to a new studio outside of the house, we can easily take these with us and add more to it, and it will be seamless!
I love a good con list
Here are some things to think about before you go crazy with Ikea cabinets in your studio.
- They are VERY DiY. This is not for you if you’re not into building an Ikea bookshelf. They do have install services, so it’s not totally out of the question.
- You might need to go into the store to talk to someone. They have a lot more knowledge of its inner workings and can advise you on some things to make it easier in the long run. Not convenient if you don’t live near an Ikea.
- This is what I call Advanced Ikea. It requires a lot of tools. You need a drill (a good one, better yet, get two), a circular or table saw, a jigsaw, stud finder, drywall anchors, a level, clamps, and caulk.
- It goes fast initially, and then when you get to the side panels – omg, does it get tedious.
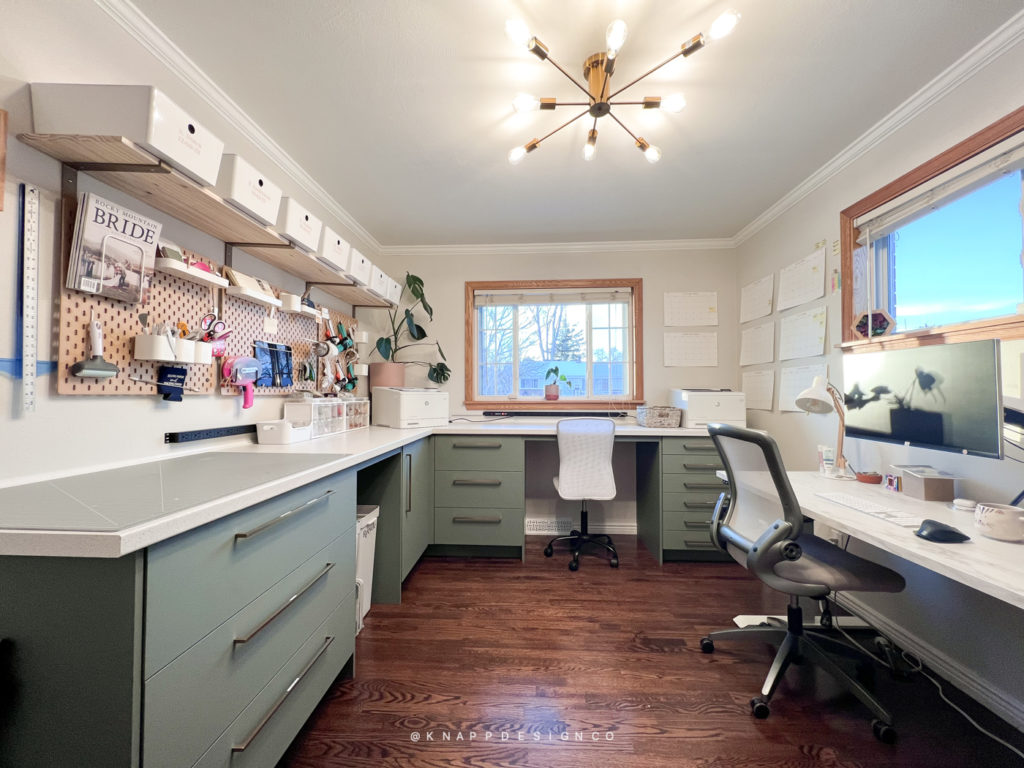
Some features we added to the studio that we love:
Pegboard wall:
We put up some pegboards above our main workstation to have all the tools we need handy and ready to go. The pegboard is the Skådis system from Ikea.
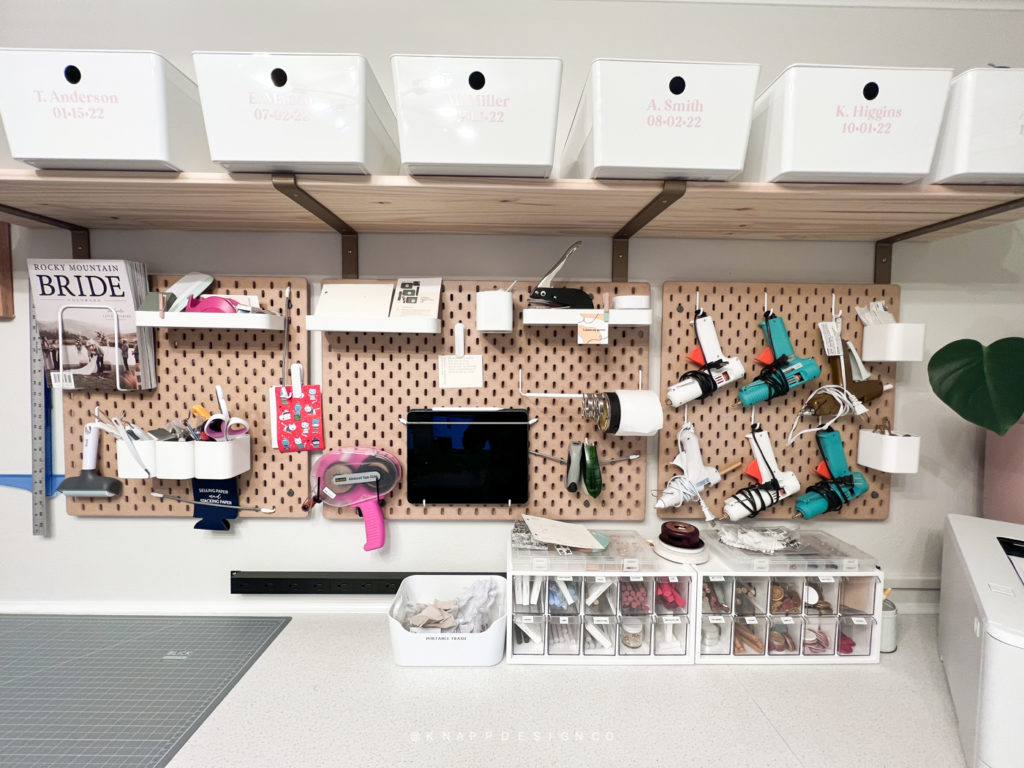
- Pegboard system from Ikea
- Drawers used to organize wax sealing supplies
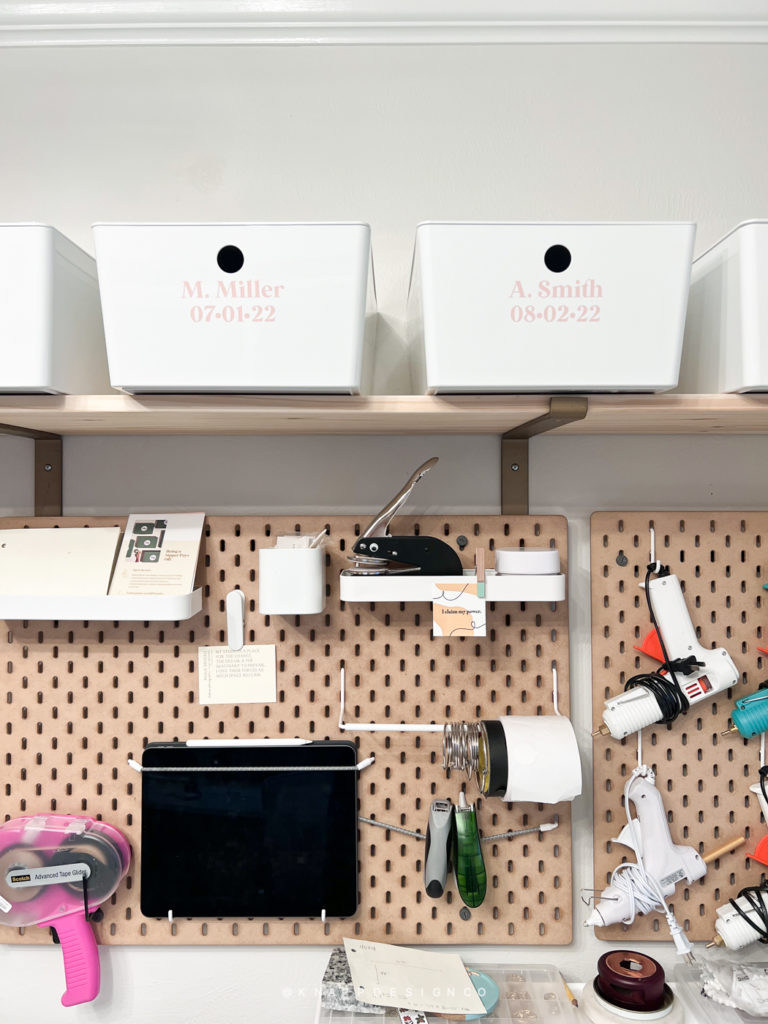
Shelf for all our client boxes
Once we start receiving goodies for our clients’ invites/save the dates, we assign them a box. We’ve been doing this for a long time, but we upgraded them to these deeper white boxes from Ikea this year. We just cut out their name & date on our Cricut and apply it to the box.
The brackets are from Home Depot, and the wood is from Lowes!
Power strips galore!
One of the biggest annoyances we had in the old space was that there were only one or two outlets we could access easily – so my Husband found these large power strips and mounted them above our workspaces. Now, we have 16 outlets in each space for our wax seals guns, laptops, iPad, Cricut, phone chargers, printers, etc. It’s amazing!
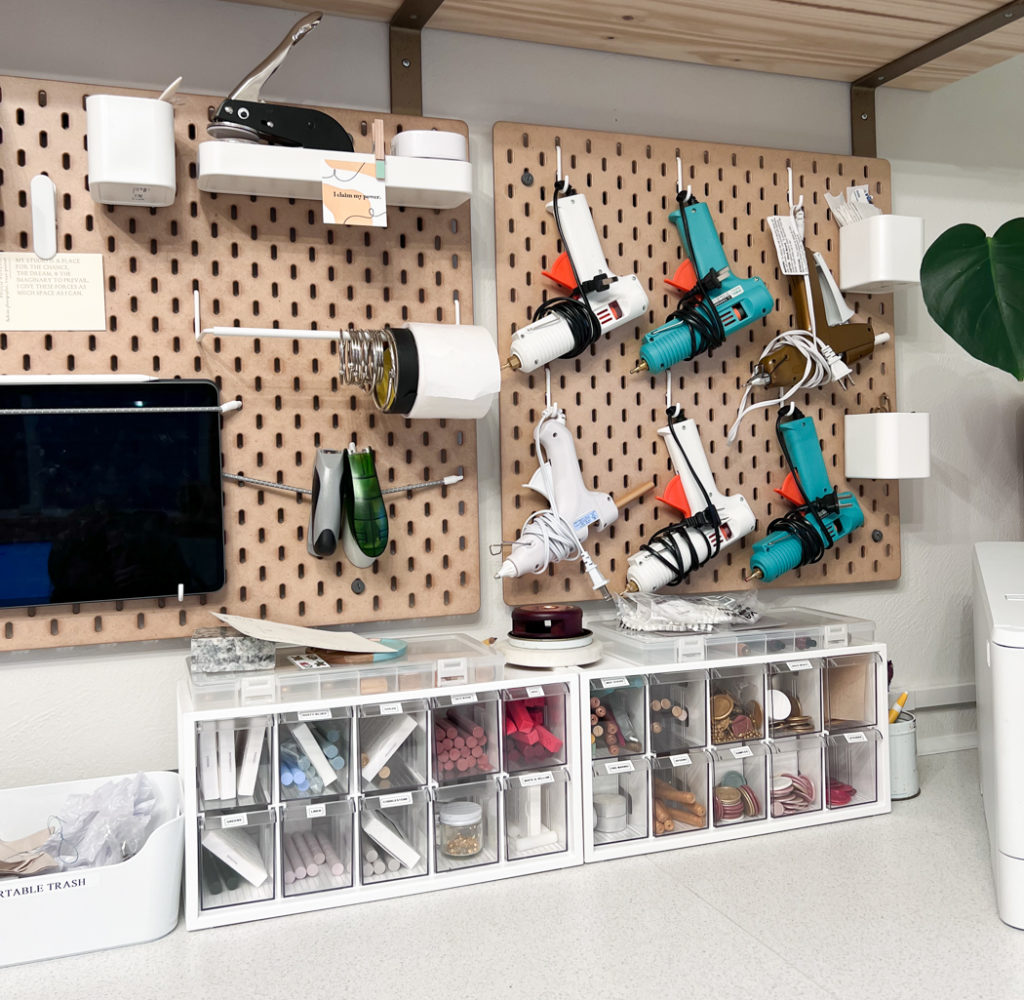
Wax seal battle station
We have a lot of clients with wax seal needs this year, and we wanted to make sure it was easy for us to access without having to pull out a bunch of stuff from random areas like we used to do. We hung our favorite sealing guns on the wall and then organized all our sticks by color and our stampers/handles as well!
The containers we used for our wax seal battle station are from The Container Store, and we love these little drawers so much. They stack easily, and we can pull them out, so we can access the whole drawer’s contents at once!
Shipping station.
In a previous life, we had all our shipping stuff in random places, so we decided to make a dedicated area for it! We keep bubble wrap and larger boxes in the closet. Clear bags, tape, labels, chipboard, and rigid mailers are all organized and easy to access now! Roland (our label printer) even has his own little space!
Organized and labeled drawers
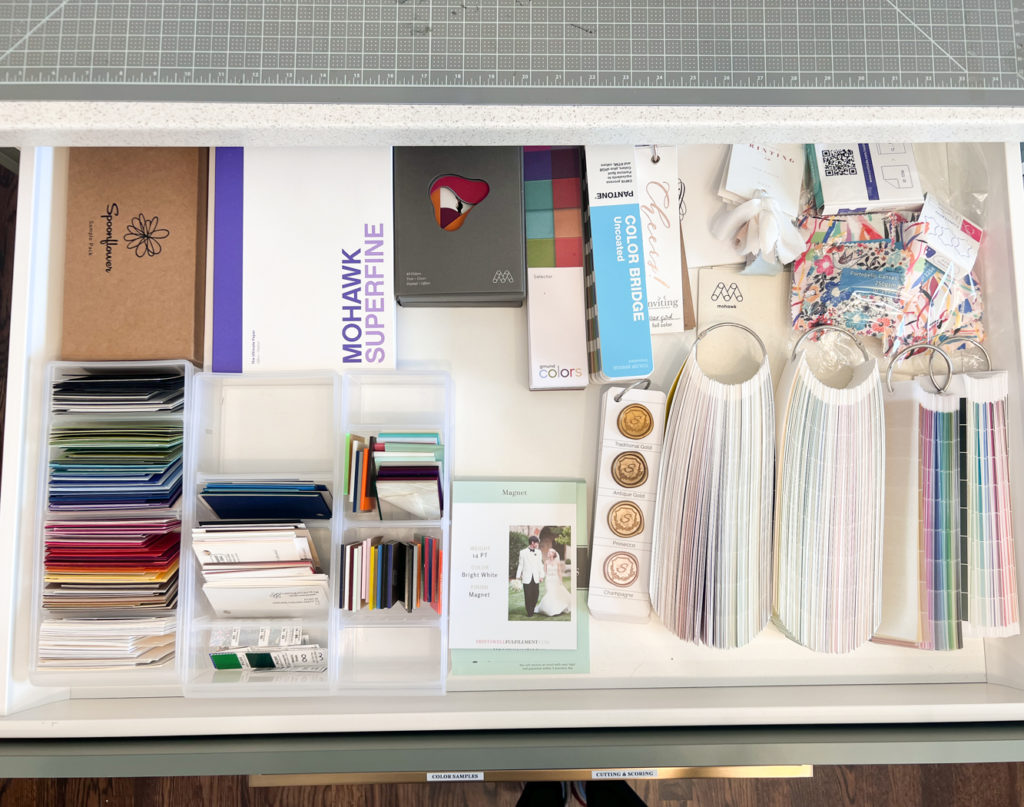
We’ve been struggling with finding a way to organize our color samples, so we dedicated an entire drawer to them! It’s a hidden drawer, so it’s tucked away until we need it – which is excellent!
Our corner unit has shelves that pull ALL THE WAY out – which is where we keep things like cleaning supplies, paint, and other random stuff we don’t use that often.
Lighting
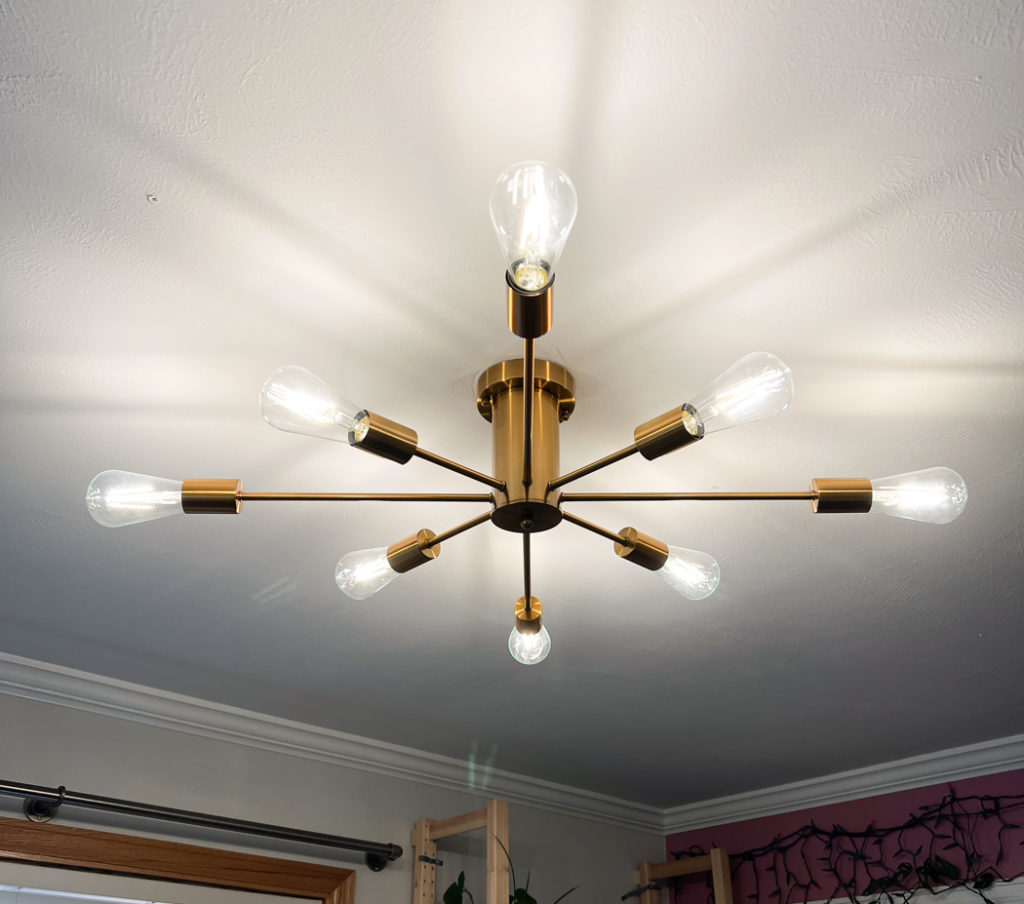
We finally upgraded our lighting for the last time. We had this LED light that was supposed to be soft yet bright – but really, it just created terrible shadows, made a buzzing noise, and would flicker randomly.
Our kitchen has these LED Edison-style bulbs that I’m obsessed with, and they were perfect for this light fixture I found on amazon! Super easy to put together and mount – bonus points to my Husband for doing that for me!
The room is so much brighter now, and there’s no more flickering!
Price breakdown
Cabinets
Ikea
36” wide with 3 drawers and 1 hidden drawer ($399)
- Base cabinet – 36” @ $58.00 ea
- 2× Maximera Drawer (medium) @ $73.00 ea
- 2× Maximera Drawer (low) @ $66.00 ea
- Drawer faces
- 3× Bodarp 36×10” in gray-green @ $36.00 ea
- 1× Utrusta drawer front for the hidden drawer @ $21.00 ea
24” cabinet with 3 drawers and 1 hidden drawer ($327)
- Sektion base cabinet – 24” @ $46 ea
- 2× Maximera Drawer (medium) @ 49 ea
- 2× Maximera Drawer (low) @ $42 ea
- Drawer Faces
- 3× Bodarp 24×10” in gray-green @ $28 ea
- 1× Utrusta drawer front for hidden drawer @ $15 ea
24” Cabinet with 6 drawers ($436)
- Sektion base cabinet – 24” @ $46 ea
- 6× Maximera Drawer (low) @ $42 ea
- Drawer Faces: 6× Bodarp 24×5” in gray-green @ $23 ea
Corner Unit ($263)
- Sektion corner cabinet 47” @ $78 ea
- Utrusta corner base cabinet pull-out shelves @ $139 ea
- Bodarp Door in gray-green @ $46 ea
Cover panels and fillers ($321)
- 6× Bodarp cover panel 26×36” @ $49 ea
- Bodarp cover panel 15×32” for corner cover pieces @ $27 ea
Legs, toe kicks, and suspension rails ($128)
- 2× Sektion Suspension rail @ $15 ea
- 2× Bodarp toe kicks @ $24 ea
- 5× Sektion leg sets @ $10 ea
Countertop ($217)
- 1× Saljan countertop 98” @ $79 ea
- 2× Saljan countertop 74” @ $69 ea
Total for Ikea: ~$2,100
All the other items!
- Drawer Pulls
- 10× Stanton Pull 12-15/16″ @ $18 ea
- 3× Stanton Pull 18″ @ $25 ea
- 2× Amazon basics 16 outlet power strip @ $34 ea
- 8 bulb sputnik style flush mount light fixture in brass (pictured) or black. @ $59 ea
- Feit Edison LED light bulbs @ $20 for 4 bulbs
- Cord cover to hide power strip cords @ $18 ea
- 4× 12in steel shelf bracket @ $16 ea
- Pegboard is the Skådis series from Ikea
Jan 7, 2022
How we remodeled our in-home studio to maximize space
Hi! We're so glad you're here!
Knapp Design Co. is a luxury wedding invitation studio in Denver, Colorado. We serve couples worldwide.
We would love to create something beautiful for you!
let's chat→
© 2025 knapp design co.
info@knappdesignco.com
Made with ❤️ in Denver, Colorado
Be nice & don’t steal.
Site Map
Home / Custom Invitations / Day-of Design / Our work / Our process / About Us / Our Studio / Shop / Contact / Journal